Showing posts with label Bonsai. Show all posts

Wednesday, May 16, 2018

All Things Change

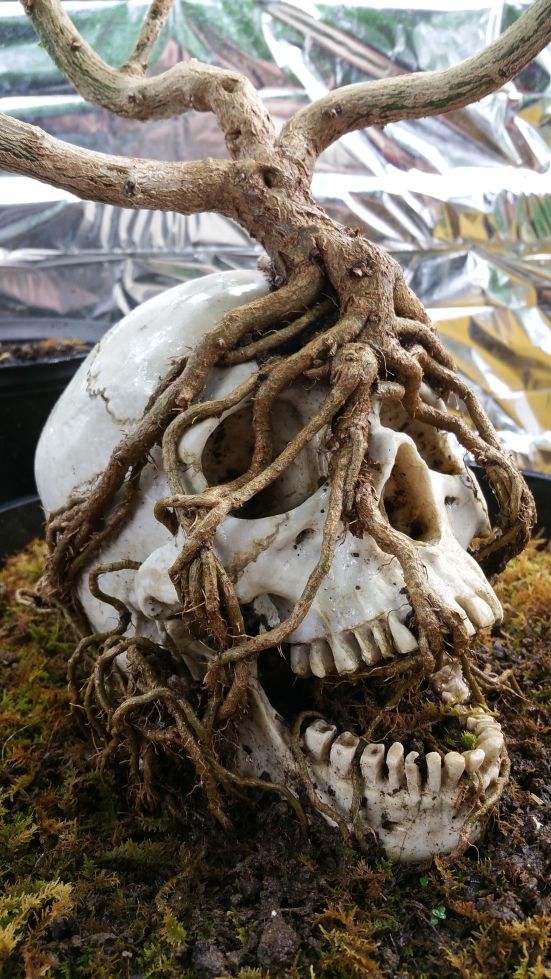
Update on the original bonchi:


Things are looking kind of rough for the old girl.  Lost the middle arm earlier, and now its looking like the right arm is a gonner as well.  Luckily, there are some sprouts near the fork, so I'm going to be looking at encouraging that one to grow and pruning the deadwood above it back once it takes off.

Officially in unknown territory now, as I'm not sure how its all going to go, but hey, such is life.  All things change, and rarely do they go 100% according to plan!  Who knows, maybe in the end we'll end up with something even better.

While we wait to find out however, I went ahead and started up a new one.


This one is again using some aquarium/terrarium decorations I found at Pet Smart.  Small (dare I say child sized) skull and an arm with hand that matches for size if not entirely in color.  Side note, really, what is with all this stuff always being different colors?  Can't you make matching bones, Pet Smart terrarium decoration supplier person?  Anyway, hot glued the two pieces together (didn't bother with superglue, the gaps were too wide for that), and put an orange habanero on top of it.  Spread the roots around really well, between the fingers, into the eye sockets, so hopefully it will turn out well.  Should make a nice Halloween looking piece to have the almost pumpkin looking orange habs growing over this setup.


Update on the rib cage diorama, you can see the reapers are growing quite happily.  Going to let them have a few more weeks before we start on the pull downs.


Also a bit of a deviation for me, this one is an ACTUAL TREE!  Specifically, it is an olive tree as my wife loves olives.  Its too cold here to grow one outside year round, so if I'm going to have to overwinter it, I might as well bonsai it!

Bought the tree from a local nursery and pruned the top back by about half, and noticed that it had a small shoot coming out near the base, and then nothing but bare trunk up for the next 2 feet.  Said screw that, and started encouraging the lower branch.  Later, I'll prune the trunk back SUPER hard right above the lower branch to get it to have a nice bend/taper.


Heh, and just because I could, one rosemary from Walmart + 5 minutes with the snips = adorable herb bonsai!

Thursday, April 12, 2018

Living Death Bonchi: The Next Generation

Okay, update on the original Living Death bonchi first.

We had some die back on the old girl due to aphids I was fighting all winter long.  The middle branch died back pretty much to the split, and I had to remove all of it.  We also lost some of the roots over the skull's face.  I'm afraid she just ain't as pretty as she used to be anymore.


I'm not giving up on it yet though.  There is a new shoot coming from the branch split that I'm going to promote.  With a little luck I can get it going well, and then prune back the two remaining woody arms and start a whole new shape!

But, just in case I can't, this year I've decided to start the second generation of Living Death Bonchi.  And this time, it won't be quite so simple!

Meet the new crew.


Yes folks, that is not one, not two, not three, four, or five reapers.  That is half a dozen of the little buggers courtesy of a local nursery that just started carrying them this year.  I bought at least a third of their entire stock they had set out for this project (because hey, reapers are a pain in the ass to sprout)!

Now, it wouldn't be a Living Death Bonchi without some death, right?  So what kind of bones are we growing on this year?  Found these little beauties at the pet store as lizard terrarium decorations.


Not gonna lie, kinda wish the skull had been just a big bigger, but it matches the rib cage perfectly so I'm going with it.

I've kind of gotten the raised bed spoken for this season with other veggies (like horseradish), so I'm going to do a container grow on this diorama piece.  Now, this comes with risks and potential rewards.  I've selected an old but large storage bin that is fairly deep.  It should provide more than enough depth to make the plants happy, but may end up getting really warm this summer.  I'm pretty sure this is the same tub I successfully grew corn in once upon a time, so it should be good.  It also means that there isn't a lot of room for anything to grow out sideways, which will help contain roots to only the area I really want them to be in.

First step, as terrarium decorations, these bones are hollow.  Gotta fill them up!


Pretty simple start there, mostly just making a pile of dirt where the ribs will go then smooshing it down on top, and then packing more in all of the holes until it was fairly solid.


For long time readers, I'm using the same process I did with the skull.  For new readers and/or those not familiar with root over rock bonsai technique, a quick rundown of what we're doing.

First, I ran the plant under an outside faucet turned up to a decent pressure to wash all of the soil from the roots.  Second, I place the bare roots down on the "rock" (in this case the ribcage model) and spread the roots out.  Some I push down into the openings, some I leave splayed across the tops.  Third (and not pictured because my hands were full), I packed a bit of dirt over the top of the roots to hold them in place (and keep the plant upright) while I moved on to the next one.

In total, I used this technique to start all six plants in their new homes.  Five on the ribs, one directly on top of the skull.  Once they were all in place, I simply bulked up the soil deeper all around.


Since I wasn't able to get pictures of it before I filled it up (the balance was pretty delicate and I had to hurry), I've overlayed images so you can see where things are.


So, the goal to this one is a "forest" style display with multiple "trees" growing in a thicket.  I'll use the same pulldown method as before to hopefully cover everything in a tangled mass of roots.

The biggest challenge for this is going to be keeping the individual plants healthy and happy at this extremely close range to each other.  Crowding will definitely be a threat, and they're going to suck up water and nutrients at a much faster rate.  Might even lose a plant or two if they get stunted and shaded out by the others, but I'll be keeping a close eye on them to try and prevent that from happening.

So, the old is changing, and the new are well under way.  Its going to be an interesting season!

Sunday, October 1, 2017

Three Years Lead to This... Can We Pot It? YES WE CAN!

Okay folks, this was the big day.  Over the past week or two I've pulled the project Reaper from the beds, let it recover.  Chopped the limbs back, let it recover.  Now, I pulled the dusty old bonsai container I made for it WAY back at the beginning of this blog, nearly 3 years ago, out of the closet and went for it.

So, the question we're all dying to know the answer to:
"Was all of this worth it?  Does it look awesome?"


 Yes, yes it does.  It looks AMAZING.

Folks, this was all worth it, I've truly got a one of a kind bonsai here, and I love it.

Now, we're not done yet by any means, but this was a huge milestone!  Now we move from creating the bonsai to refining it.  To making the canopies fill out jusssssst right, and maintaining it.  But ladies and gentlemen, I present unto you...

The Living Death Bonchi


Monday, April 18, 2016

Whew, I didn't screw it up! I mean... Season 2 Begins!

As per the post title, WHEW!

It was two weeks ago that I gave the project reaper it's super hard chop to get rid of the second round of aphids and clean out the entirely too dense branches that had developed over the winter from the previous chops, and a week since I put it out in the raised bed.


Was starting to get a little worried that it was too hard of a chop followed by too cool of weather (it dipped down into the 40's a time or two), but checking it today reveals:


See 'em?  See the little green leaf buds?  ITS ALIVE!

Okay, I didn't kill it.  Its warm (its actually 85 out there now), and we should be all good.  WHEW!

---

Ahem, composure regained, lets get back to some actual update news.

As you can see in the above picture, I buried the plant back up to the base of the skull again.  I had several issues with the neck, namely a lack of stability and several important face roots keeping a rather tenuous grasp on the soil.  Decided that it was worth a shot, but that I'd rather stick to a good looking version of the original design than keep pushing the neck that might end up ruining the entire thing.

This season should be a good one for it.  Without the constant pulling down of soil, the plant itself should be much less stressed, which means it should get a lot more growth.

Now, while I will be continuing to selectively prune off new growth in areas I don't want (like down on the base trunk or too low down on the limbs), I intend to let it grow however it wants above a certain line.  I want it to grow big, tall, bushy, and set lots and lots of pods.

Why?  Because that is how we will thicken the trunk, the limbs, and the roots up to truly gnarly proportions!

You see, the roots and the trunk will only grow thick enough to support the current amount of foliage.  If I were to keep it pruned down to proper bonchi size now, the trunk and roots would essentially stop developing.  Sure, they'd grow a little bit, but its the constant pruning that stops a bonchi (and bonsai in general) from getting bigger.  But to get them up to size, you want them to grow lots of leaves so that there is a constant demand for ever increasing amounts of support.  Same for the roots, the greater the demand for nutrients, the more root development we get.

So, by letting it grow big and bushy (note to self, get a tomato cage to put over this one so the extra growth has some support and the lower limbs don't break) we should thicken the trunk and limbs up, and especially setting pods will put a lot of demand for nutrients on the planet, which should turn our spindly roots into a real gnarled mess, which will be great.

Sunday, January 31, 2016

Steven, your neck! You have one!

Okay, I was going to be happy with just the skull sitting on the forest floor, but that image of the roots making a neck the last time I repotted it have stuck with me, and today was incredibly warm (almost hit 70... in late January), so I decided to push it a little further.  I decided to give the main project a neck.


As you can see, he currently has a rope around his neck.  Its to make sure the roots pull in close together under the skull to make a proper neck and not just have it be a pile of roots with the head on top of it.


As you can see, its pulled tight enough to even give him a chin!


Only weak spot that I've seen so far is in the back where it doesn't really have the root density to support itself in the proper position right now.  I'm hoping that much like the roots on the face the neck roots will thicken and toughen up enough to lock it into place, but in the mean time he gets more soil under the back of his head to make sure it doesn't lean over at an odd angle.

Wish I had some vertebrae I could stick in there to make a spine to hold him up, but alas.

Next time!

Tuesday, January 26, 2016

Aphid Free!


The good news is that everybody is growing back nice and healthy after the defoliation and extreme spray down to get rid of the aphids once and for all.  Which worked, btw, haven't seen a single one since I went crazy on them.

Now that they're leafed back out in new growth, I can go back in and take off the older, damaged leaves from the Time of Aphids.  Had to leave some on to make sure I didn't hurt the plant (don't wanna strip one 100% bare when you do that if you can help it), but they don't look very pretty compared to the flawless new growth.  So, time to take them off here soon.


And yes, that was ice in the corner of the grow cabinet you saw in that first picture.  Its been kind of, you know, cold here in winter, and my rain water was frozen rather solid.  Still wanted nice soft water for starting new seeds with though, so I just tossed some rain water ice chunks on top of the starter trays full of soil and left them to melt overnight.

Once melted, I just stuck a heating mat under the catch tray to warm things up and planted half a dozen mystery pepper seeds for a family member.  Not quite sure what they are, they just told me that it had been the best sweet pepper they ever got from a farmer's market that said it was heirloom, and they gave me the seeds from it.  So, I'll give it a go at growing them, see what it comes up as.

Still debating on if I want to bother with ornamentals or not this year.  Can't really eat 'em, and they don't make good root bonsai because they're so small they don't get impressive root systems.  Can't eat 'em, can't display 'em, what good are they?  Eh, I suppose if I kept one going for several years it would end up looking pretty good... they're just not as much of a case of instant gratification as the big peppers are.

I think I'll give the Cumari another go at least, it was an interesting little pepper, even if it didn't do well as a root over rocks.  I'm sure I can find something interesting to do with it.

Wednesday, December 30, 2015

Mr. Worf, fire photon torpedoes. Full spread.

Okay, the aphids continue to be a problem.  I've tried the nuclear option of sevin all over the place, I've tried neem oil, I've tried speaking to them in a very cross tone of voice, nothing has worked.  In fact, since I moved the sweet potato heart in, its gotten worse.


 As you can see, aphids on the pepper leaves, and eggs/larva all over the sweet potato leaves.

So screw nuclear, time to resort to anti-matter!  Step one, defoliation!


Okay, not a complete defoliation, but pretty hard.  Found lots of the little buggers in some of the dense foliage where the sprays obviously weren't reaching.  This cuts off the heavy growth that protected them.  Then they all got a good soaking with a mixture of water, neem oil, dish soap, and liquid sevin.  I mean dripping wet over every square inch of plant.  Top, bottom, sides, the dirt, everything.


And just for good measure, while the grow box was empty I sprayed the insides of it down with the same mixture on the off chance magical aphids were hiding in the walls or something.

Frankly, if this doesn't end my aphid problem once and for all, well hell, I'm taking samples of the things and sending them to the military for biological weapon testing.  They're clearly immortal super bugs, there has to be some way to weaponize that!

Tuesday, December 1, 2015

Moss Test Grade: C-

Okay, its been a little over a month since I started the moss test, and I think the results are in.


Despite daily spraying from the bottle with rain water, the moss is looking pretty... autumnal?  Is that a word?  Spellchecker thinks it is, so I'm going with it.  Yeah, it looks more dead than anything else.  Its not entirely dead, as you can still see green underneath the top layers on the soil surface, but it seems the dry indoor air and the fans in the top of the case make it just too dry for it to thrive.

So, verdict overall is a C-.  Its not a complete failure, but its not very good as a permanent fixture either.  For a short term thing though, it looked great!  I'll be sure to give it fresh moss when I dress it up for final show-off pictures.

On a related note, the cultured moss I brought inside is also suffering from dry air, though I have been keeping it in soggier soil so its done better overall.


Same dead extremities, but a much greener under story.  I decided that since its rainy and fairly warm out for the time being, I'd put it outside with the stuff I left out there this whole time (and give it a good soaking of rain water).  The comparison picture here tells the story, IMO:


What I've had indoors is struggling, but is much darker green.  The stuff that has been outside is thriving, but is a much lighter, almost neon green.  Tells me I probably haven't given the indoor stuff as much light as it would have liked, along with the indoor heat and air making it too dry for it.


Anywho, I dug the mostly dead moss out of the skull.  I was kind of hoping that maybe the moss would hold enough moisture to encourage some new roots into the eyesockets from the pepper, but that didn't happen.  Just didn't stay damp enough for long enough at a time, so oh well.


But as you can see, the peppers are loving the conditions in the box.  I gave them a feeding about a month ago with some miracle grow mix (they've been in these containers for a while now with nothing but what was in the leftover soil), and I didn't want them to go hungry on me.  Nice dark green leaves mean happy peppers!

Thursday, August 27, 2015

Back in the Saddle

Well, I had a wonderful week and a half there with a dead computer.  How was yours?

Anyway, back up and running, so time for some updates!


The amount of moss I've been able to grow so far has been insufficient for my needs so far (told you this stuff grows slow!), but I found a great big patch of the stuff ready to go.  So, I cheated and harvested the moss I'll eventually use.  Put some of that fine clay mud I gathered last year in a pot base and grabbed enough moss to make a full ground cover when I need it later in a month or so.


Here, along with the fact that I need to cut the grass, we can see that the chop I did on the project reaper has created longs of nice new growth.  All is well there.  However, all was not well when I measured how big the bonchi was in that old green pot and compared that to how much space was available in my grow box.  Its too tall to fit comfortably, and the other night it actually got down into the high 50's so I figured that since I was going to have to bring it in anyway, I might as well repot it into an overwintering container.


Luckily, I already had this plastic faux half wine barrel style pot laying around.  Its about half as tall as the green one was, but still deep enough that I could have some dirt underneath the "neck" of the roots from earlier.  So, still gives it some room to grow in.


Still looking good, and I won't have to worry about repotting anymore, its fully ready to come inside when the weather turns cold on a more permanent basis.  Now, high 50's wouldn't have killed a pepper, but this one at least I don't want to even have a slow-down, so anything under 60 and it comes inside.  And if you're wondering, the green thing is an ant bait plug.  Had some small little ants living under the green pot, and just wanted to make sure that they didn't stick around long enough to cause any problems.


Minor update, the Cumari started showing signs of leaf yellowing after all the heavy rains we had (combination of being in a small container and lots of rain, wet dirt and nutrients being flushed out), so it got repotted into the same pot again with fresh soil and some fertilizer.  The roots on it were looking really good, so I went for a pretty big pulldown on it.  Doesn't seem to have minded one bit.

On a sadder note, the Buddha bonchi is pining for the fjords.  It has ceased to be.  Its dead, Jim.  Oh well, it was a fun diversion, but it didn't really get the good root development I wanted for a long term keeper.  C'est la vis.  It's soft parts went in the composter, and it shall help nourish the next generation.  Ashes to ashes, dust to dust.