Thursday, January 22, 2015

Victory!

https://www.youtube.com/watch?v=-YCN-a0NsNk

And since I'm officially in a "I want to do stuff" mood, I decided to go ahead and do the pulldown on the Laughing Peter.


Dug about as far down again as I had the first time, trimmed off the plastic, and using a spray bottle full of water carefully removed the soil.  As you can see, there was a pleasant surprise in how several good sized roots have wrapped around Buddha's belly.  Always a good sign to have big fat roots this early, especially onces that are nicely hugging the "stone".

While I was at it, I also removed the wiring, as I saw at least one spot where it was just beginning to bite into the trunk.  So far I'm quite happy with how this one is turning out, and its great practice for the Reaper on the skull in a few months.

Wednesday, January 21, 2015

Death is in the House!


Death makes a house call!

Okay, the AeroGrow thing was a waste of money, it couldn't do jack.  My homemade one that I threw together for less than half as much in parts?  Well, I'll let results speak for themselves.


That is one genuine (I hope) Carolina Reaper.  Checked the other slots, and all of them had germinated.


So, since I've got 4 sprouts now, I've gone 4 different ways with them.


For the first one, I put sponge and all into some potting soil, watered well, then covered the top with dry potting soil.


 One of the others I transplanted into a small starter cell still attached to a piece of sponge, but not the entire thing.  Another I removed from the sponge entirely and put into soil.  The third I am leaving in the bubbler to see how it does with hydroponics.  I figure I'll see which ones do the best, and which ones do more poorly, and use that information in the future for raising young nuclears.

Since they've all germinated, I've taken the heating fan out from under the cabinet (they need high temperatures to germinate, but will grow just fine at room temperature), and turned on the overhead PC fans.

Had some trouble with my fancy digital power strip, so I've replaced it with something better in the long run anyway.  Two mechanical timers.  That lets me have the lights on a 16/8 hour cycle, and the fans and bubbler on a 30/30 minute cycle.  Lights are on from 8 am till midnight, while the aerator for the bubbler and the PC fans are alternating on and off every 30 minutes.

Everything is officially at full power go time mode!

Sunday, January 18, 2015

Like Watching Grass Grow...

And we're in the boring part, not a whole lot going on while I just sit back and wait for everything to do their own thing.


The test batch of Halloween peppers all sprouted, although one was an albino.  Kinda weird, the leaves stayed white and didn't improve, I ended up pulling that one and lost one to damping off somehow.  Probably because I didn't have the top fans on, as I'm using a bottom heating fan to try and warm it up for the Reapers to sprout.


Went ahead and decided to try transplanting one of the Halloweens over to it's own pot with a skull in the bottom really early.  Normally I'd wait until we had at least a couple sets of true leaves on it, but I'm getting a little bored and wanted something for a post, so I went ahead and did it now.  The above picture of the seedling was taken several days after the transfer, so it obviously survived and is putting out it's first true leaves, so all good there.


Gone ahead and started 6 more Halloweens to have enough stock to really mess around with later, but these I'll leave in their starter plugs until they have at least a set of true leaves on them.  Transplanting as early as I did that other one is risky.  I've grown these before, and they stay pretty small, so I'm thinking I might try grafting the stems of three or four of them together to get a single really beefy trunk out of them.  Will also mean lots more roots for interesting nebari work.


Speaking of nebari, the Laughing Peter is doing well after it's chopping and wiring.


As you can see, we've got some roots that are plumping up, and some that are withering back.  Thats exactly what we want, let the plant decide which roots are strongest right now and beef them up for us.  As we pull down more and more, it should keep winnowing the weaker roots out for us, and then at the end we can manually prune any that are left over that we don't want.

Its been about 2 weeks since the initial pulldown, and I'm tempted to do another pulldown now.  I know from past experience that the plant would be just fine, but I want to take my time on this one and let it really have plenty of time to get used to whats happening, so I'm going to wait until next weekend for another pull.

I've also been watering inside the bag more since the pulldown because I want to make sure the exposed roots that are still in contact with soil have a reason to grow quickly.  We're mostly past the point of encouraging deep root growth now.  The pulldowns will do that for us, so instead its time to focus on ensuring the exposed roots keep functioning.  Whole thing will be for naught if the roots we're digging out all wither and die back save for one or two really deep ones.  So, watering inside means they're encouraged to keep growing, and the pull downs will force them to keep going deeper.

Remember, better to have an embarrassment of riches now when it comes to roots than not have enough to choose from later on.

Saturday, January 10, 2015

Here We Go!

Okay, I just want to say I tried making this post from the official Blogger app on my phone, and well I won't mince words.  That app is a complete and utter waste of time.  Its unintuitive to say the very least, and the entire lack of even the most basic features makes it unusable.  I mean, really, even when you finally figure out how to get a picture attached, it centers everything and you have no way to return your text to a left justification, what the hell?

So yeah, everybody can just wait until I get time on a real computer to do this, because the app is so far beyond useless it isn't even funny.  Freaking first year computer science students could have built a better app than that piece of crap...

ANYWAY!


Got the cloner painted, figured I'd make it some nice gardeny colors, so brown bottom and green top with brown plugs.  I think it kinda feels like a Minecraft block, personally.


The Reaper seeds are still stubbornly doing nothing, but they are still alive (or at least they aren't rotting), so giving them more time.  Its hard to sprout nuclears, and I'm guessing the less than optimal soil temperature (even with the seed heating mat underneath) is slowing them down.  So to help out a bit, I've put a small space heater inside the bottom of the cabinet and set it to 80 degrees.  Hopefully it'll stay on enough to blow warm air up into the cabinet to keep it quite a bit warmer than it has been.  Good news though is that those NuMex Halloween peppers I started last week have sprouted.


Now, as ornamentals, the Halloweens won't get anywhere near as big as the Reaper will, but I want to stick to my "Roots over Rock Skull" theme for the blog, so I picked up some of these.

They're little aquarium decorations I found at Walmart for a buck or two each.  I'll try to do essentially the same thing with them that I'm planning for the life sized Reaper piece.  If they work out, maybe I'll sell a couple of them.  Anyway, I started four of the Halloweens, and as you can see in the picture above I've got four sprouts, so I got four of these little skulls.


The peter pepper cutting I've got in the AeroGrow appears to be having a hard time.  All of the smaller leaves have fallen off, and honestly I don't think its going to make it, but I'll leave it in there for now, maybe it'll surprise me.

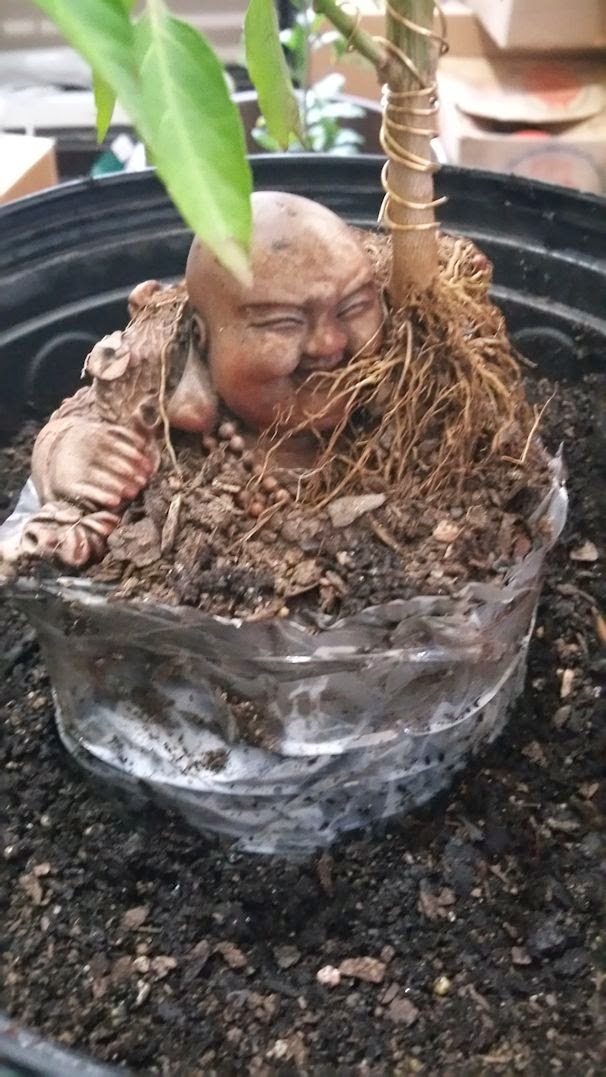
So until the Reapers sprout (if they sprout, when they sprout, the damned things better sprout!), I guess I'll be entertaining everyone with the progress of the Laughing Buddha and Halloween Skull side projects.  Both of which are good practice for the Reaper, let me get some experience with various techniques so that when I do move on to the real thing I know what works and what doesn't.  Don't wanna be doing trial and error on that one!

Wednesday, January 7, 2015

A Clone of My Own

After looking over the Aerogrow hydroponic kit I bought the other day, I realized I could build better myself.  So, I did.

One bubble cloner, some assembly required.

Material list is:
1 cake carrier
2 airstones, 10"
4 plastic shotglasses
8 feet of aquarium tubing
1 aquarium air pump with dual nozzles


First thing I did was make the net cups.  Yes, I know I could have just bought some flimsy ones off the internet fairly cheap and waited for them to come in, but I wanted something a little more heavy duty and a little more "in my hands right now".  So, took the drill to these red dixie cup shotglasses to provide lots of ventilation.


Roughed out where they would sit in the lid of the cake carrier, sans handles and cut them out.


And then just put in the airstones, drilled some quick holes for the tubes, and assembled it all.  Pretty simple build, really.


Filled with water and turned it on for a test run, and success.  When the airstones are right under the cups, we get lots of bubbles going right up into them.

Next step will be to enlarge the holes a bit more so the cups sit deeper in, and give the whole thing a quick spray painting to make sure I block out the light, but its essentially done.  And I made sure to keep it slim enough to go into the grow cabinet on even it's shallowest setting.

Then just gotta find something to use as a medium in the cups (so that what I root will have actual roots, and not just water roots) and it'll be ready to use.


Tuesday, January 6, 2015

All Tied Up

Well, since this laughing buddha bonchi is essentially my test bed for everything I plan on doing with the Reaper proper, I figured this was as good a time as any to wet my feet on wiring.

All of the other bonchi's and bonsai's I've done, I've let the branches mostly go however they grew, just pruning off the ones I didn't like.  Time to step that up a notch.


Figured I'll try for a bhodi tree look for the bonchi, which is generally depicted as a half sphere or a full sphere in the stylized artwork I've seen.

Now granted, I don't think I'm in any danger of having someone accuse me of being *GOOD* at wiring, but I think I did it well enough to get the job of bending those branches out away from the vertical in order to start on a canopy for this bonchi.

Hopefully the root pull down, the chopping, and the wiring in such close proximity to each other won't be too much for the pepper.  But if I've learned anything in my years of growing peppers, they can take a lot of physical abuse, so it should be fine...

Attack of the Clones

The peter pepper currently being used on the laughing buddha statue is one that I container grew last season for a friend who just wanted to see the pods off it, so it never got overly large, and I left the pods on it when I brought it in to extend the season for it (since I planted it very late).  Never did get a proper chop back for overwintering.


Went ahead and cut it back, and since I am stressing it with this rooting stuff, I went ahead and dug out a small grow light to go with it as well.  While gathering up the clippings, a thought struck me.

That mini hydroponics kit I have some of the spare reaper seeds in, I bet that thing would make an excellent cloner!


So I picked the branch with the most interesting structure, trimmed it into a proper cutting, gave it a quick dusting of rooting hormone, and traded places with one of the reaper seeds (which is now in sterilized coir to finish sprouting).

I have never had any luck getting superhots to clone successfully.  If this thing can get that peter pepper clipping to root, it'll be worth every penny I paid for it.  Never had any intention of using it for more than getting seedlings up, but if it proves to be an effective cloner, its going to see a lot of use!

For starters, the most successful grafting technique for peppers is an approach graft.


Reason it works so well is because the scion (the piece you are grafting onto the main plant) has it's own root structure to support it while the two plants fuse.  Once fused, you just cut the bottom off the scion and its now entirely dependent on the stock plant.

Problem is, you normally need a fairly large scion for that to work with, which means sacrificing a full plant.  Not ideal.  But if I can use trimmings from the same plant, root them, and then use that rooted clone for the approach graft, I'm not wasting entire plants just to get a branch in a more visually appealing place than what nature decided.


Not to mention I've got this big 4 year old bhut jolokia that I've used for pod production which is currently overwintering that I could graft reaper branches onto...

Oh yes, if this thing works well as a cloner, I'm going to wear it out.

Monday, January 5, 2015

Laughing Peter Update


Its been over a month since I started the peter pepper test run on the laughing buddha statue, so I think its about time to take a look at how it's doing and start the root lengthening and lignification process in earnest.

As you can see above, I've cut the top part of my plastic bag wrapping off the pepper.  I then used a combination of a spray bottle and a watering can to wash the soil away while leaving the roots in place.


We've got some nice root work going on already, and its wrapping all the way around quite nicely.  Had it not looked this good, I would have covered it back up, but I think we're okay to leave it exposed now.

Exposing this top inch or so of the roots will cause 3 major effects that we want.  One, it will make the roots lignify (or become woody), and become thicker.  Two, it will air prune the smaller, weaker roots for us.  Only the largest roots that have good contact with the soil underneath will survive, as the plant cuts off the smaller roots that aren't going anywhere for us.  Now, if later I see that we still have too many roots, I can still prune the unwanted ones away, but letting nature do much of the work for us means less work for me, and a healthier plant.  And third, it will promote the pepper to put out deeper roots.  The plant will "know" that the top roots are now exposed, so it will try to grow down deeper to compensate.  This is a process we started last month with the bag and trying not to top water into the bag unless we had to, to encourage the pepper to grow down looking for water, but this will really accelerate the process.

As a reminder, here it was at the end of November just before I wrapped him:


You might notice in the current pictures, there are roots growing over his right shoulder that were not there when I positioned him, which is a good sign.

I'll leave him like this for another month or so, and then repeat the process.  By summer we should have something very interesting to show off!

Sunday, January 4, 2015

Sprucing Up the Blog

Okay, Google finally said I had enough content to turn on some ads, so I've spruced things up a bit.  Now, I'm keeping the ads to just over on the sidebar so they aren't obnoxious, but I run Ad Blocker, so I don't see them anyway.  Let me know if they're truly awful or anything like that.

Also went ahead and put in the translation widget because I'm actually seeing some traffic from some fairly random places, going to try and help those guys out some.  Turned on the search function, bunch of little stuff like that.  Hopefully got it set up so it won't be cluttered.

Saturday, January 3, 2015

Its... ALIVE!!!!

Woo, big day today, the grow cabinet is complete!

Wall wart came in yesterday, so I got to work on it last night.


Turned out to be a good design for the wart.  After I took the jack off, I had a pleasant surprise of properly color coded wires inside.  Trust me, more often than I care for you'll cut one of these things open and there will be two black wires inside.  Like, really?  Anyway, this made the job easy.


Twist the exposed wires together, solder, and wrap it all up in multiple layers of electrician's tape (each wire individually, then again for both to hold everything in place.  I now have my PC case fan converted to a wall plug.


On a side note, I discovered that these fans are actually 12v fans, not 6v like the package said.  No biggie though, just means I order another wall wart and do it again and get more control over if I want one fan running at a time or two.  Lesson learned though, read the fine print on the fan itself, not the packaging.


Covered the inside with the emergency blankets (took 2 blankets almost exactly).


And went ahead and upgraded the lighting to 4 CFLs, two on each side with these 89 cent Y adapters.  Its a big cabinet, I thought it safer to err on the side of overkill than have insufficient lighting.


Bam, I have a grow cabinet for my peppers!  And it all turns on and off with the press of a switch (and I can set it over to timer mode so that it can just turn on at 7 am and off at 10 pm on it's own, or whatever other times I want).

Lets see if this video works or not...

---

On a side note, while I was at Walmart picking up a few things, I saw that they are selling small hydroponic sets, so I picked one up.


Since there were 3 slots for growing and I had 3 extra reaper seeds still left in the baggy, I transferred them over to this setup.  Dunno how well it'll work, but thats what makes it fun.