Showing posts with label Grow Box. Show all posts

Friday, October 9, 2015

Nuke It From Orbit, Its The Only Way To Be Sure

Okay, its been several weeks since we moved the Reaper into it's container and I re-positioned some roots.  Time to do some pruning!

There was lots of pruning.

Two kinds of pruning happened.  First kind was the kind I've talked about before, cutting out the small stuff to encourage the bigger stuff to get bigger, and removing bits that are just cluttering the place up.  The second kind is the less enjoyable kind.

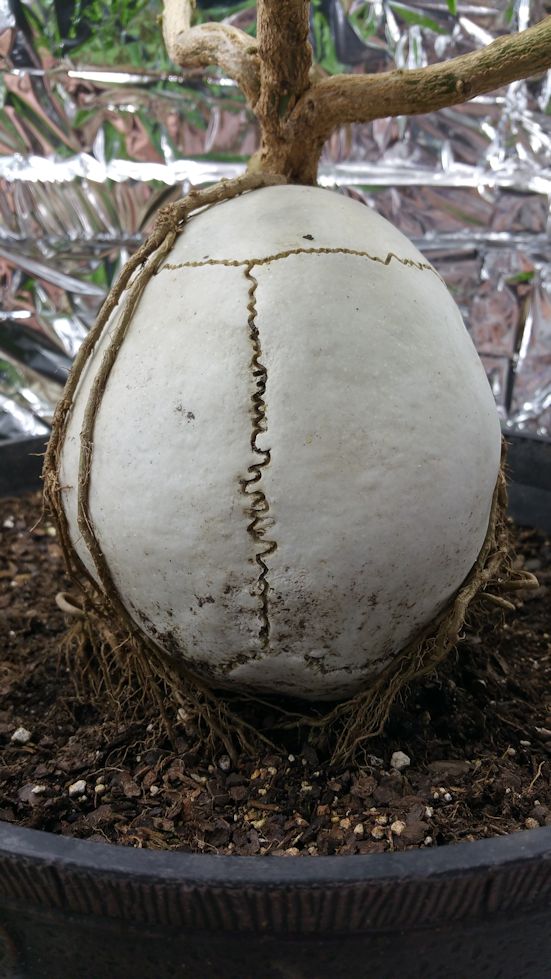
Namely I went around and gently tugged on the various roots.  Ones that are solid are golden, they're doing their jobs.  The ones that easily lift out aren't actually doing anything because the bottoms are dead, and eventually the entire root will wither away, so best to just prune those now.

Lost some roots I wanted to keep, but kept some I was afraid I was going to lose.  So, par for the course really.  None of the lost ones were project ending, so onwards and upwards!


And now, if you are particularly astute, you might be wondering what any of this has to do with the post title.  The answer is this:


Aphids.

Luckily this isn't on the project Reaper, they're on the other one, the Zombie Reaper.  Either way, there are aphids in the grow box, and its only a matter of time before they spread.

Now, as a beekeper as well, I tend to not really endorse the "spray broad spectrum insecticide on everything!" because, well, bees are insects too and I don't want to kill my bees.

However, this is indoors now.  In my grow cabinet.  There are no insects of any kind that I want to be in there, so screw it.  I'm went nuclear!


I covered everything in there in a white glaze of Sevin.  Even the walls got a soaking of the stuff.  I wanted to be absolutely sure that there was no safe harbor for them anywhere.  And today?  No aphids.

Nuke the site from orbit, its the only way to be sure.

Saturday, January 3, 2015

Its... ALIVE!!!!

Woo, big day today, the grow cabinet is complete!

Wall wart came in yesterday, so I got to work on it last night.


Turned out to be a good design for the wart.  After I took the jack off, I had a pleasant surprise of properly color coded wires inside.  Trust me, more often than I care for you'll cut one of these things open and there will be two black wires inside.  Like, really?  Anyway, this made the job easy.


Twist the exposed wires together, solder, and wrap it all up in multiple layers of electrician's tape (each wire individually, then again for both to hold everything in place.  I now have my PC case fan converted to a wall plug.


On a side note, I discovered that these fans are actually 12v fans, not 6v like the package said.  No biggie though, just means I order another wall wart and do it again and get more control over if I want one fan running at a time or two.  Lesson learned though, read the fine print on the fan itself, not the packaging.


Covered the inside with the emergency blankets (took 2 blankets almost exactly).


And went ahead and upgraded the lighting to 4 CFLs, two on each side with these 89 cent Y adapters.  Its a big cabinet, I thought it safer to err on the side of overkill than have insufficient lighting.


Bam, I have a grow cabinet for my peppers!  And it all turns on and off with the press of a switch (and I can set it over to timer mode so that it can just turn on at 7 am and off at 10 pm on it's own, or whatever other times I want).

Lets see if this video works or not...

---

On a side note, while I was at Walmart picking up a few things, I saw that they are selling small hydroponic sets, so I picked one up.


Since there were 3 slots for growing and I had 3 extra reaper seeds still left in the baggy, I transferred them over to this setup.  Dunno how well it'll work, but thats what makes it fun.


Thursday, January 1, 2015

Where's my Staple Gun?

Okay, first New Year's Resolution accomplished.


Space cleaned out to put my new cabinet in the junk/over wintering plant room, cabinet has been reassembled, and the lights put in.

Those are NuMex Halloween peppers I'm starting next to the Reaper.

I still need to cover the inside parts that are still Tardis blue with reflective mylar...

Thanks, Walmart camping supplies!

... and get the wall wart adapter in that I ordered so I can install the airflow fans, but as you can see above the general build is complete and working as intended.

Only thing stopping me from putting the mylar in is, like the post subject line, I can't find my staple gun.  It walked away sometime since 2013 when I used it last.  Now, I could use tape, or glue, or spray adhesive to put the mylar in with, but those will all lose their stick eventually.  If I want it done to last, I need to staple it in place.

*stretch*

But I've been doing this all day, I'm taking a break.  I'll head out later to get a new staple gun, and probably put the mylar up over the weekend.

Right now I have my cabinet in good enough condition I could start using it right now if I had to, and I don't even have anything sprouting above the soil line yet.  I can afford to relax for the rest of my day off!

Sunday, December 21, 2014

A Madman With a Magic Box

Weather mostly cooperated with me today.  Wasn't as warm as it was supposed to be, but oh well.  Had to get this done, because its just going to get colder and wetter from here on out.

Principle woodwork on the cabinet is finished.


And as you can see, I have the sockets cut for my lights and my CPU fans.  Everything test fits in just fine.


The doors (which I just have propped against the cabinet here) had a few issues.  Mainly I thought I could get away with using fewer screws.  I couldn't.  Instead of re-positioning the screws and leaving holes, or cutting new supports (from wood I didn't have), I just said screw it, there will be some funky screw placement.  Only downside is that the hinges I bought to attach the doors with are laughably inadequate.  I need to buy much bigger, much stronger hinges next time I go out.

Seeing as how all the places that sell good hinges are in major shopping districts, however, that may have to wait until after Christmas.

Went and dug through my old spare paint to find an exterior paint to put a couple of coats on with.  Was going to just slap whatever color I found on there and then spray paint it something better as a top coat, but the can I opened happened to be...


...Tardis blue (even if it doesn't quite look it in this lighting).  Now I'm torn between if I want to follow the original plan and paint the outside something less fanboyish (inside doesn't matter, its just coated for a vapor barrier, its all getting covered in something more reflective later), or just embrace it and paint the entire thing up like the Tardis.

Either way, tomorrow after the paint is good and dry I'll disassemble it (which is why everything has those reinforcing bars on the outside, so the top/back/sides can be taken apart into slabs to make moving it into the house by myself possible), just in time for the forecast rain for the next several days.

Thursday, December 11, 2014

Big Box, Big... Big Box...

We had some warm weather sooner than expected, and I got out to take advantage of it.


I did re-level that shelf, just forgot to take a new picture.

The real problem is going to be getting this behemoth into my back room through the house by myself when its done!

That leaves for this weekend:

* Reinforce the base with crossbars to keep the walls from flexing.
* Add additional rails for raising/lowering the shelf.
* Drill/cut holes for the lights and fans.
* Make the front cabinet doors.
* Paint it.

When all the case work is done, then I'll bring it inside and get to actually wiring everything up.  Inside, where it's warm.

Monday, December 8, 2014

Bigger on the Inside... and the Outside...

Went to Home Depot to buy lumber for the grow box.  I overdid it a bit, but thats okay.  My grow box is now going to be a 2 door grow cabinet.  Got some 1x8's and had them cut into 4' lengths, along with some 2x2's and 1x2's for the support structures.  To make sure I'm clear how I want it all to go, I fired up my favorite 3D software and did a quick CAD to scale.


This is the design I'm going for, all to scale.  Instead of pegs, I'll make internal ledges and have the bottom be a removable shelf I can slide in and out to adjust the distance from the lights fixed at the top.  Lights will be in minimal fixtures that will bet set into drilled holes in the top and then plugged into a power strip with built in timer at the top.  12' pots included for additional size reference.

Right now I have one 9w LED grow light coming in, with a pair of CFLs I'll put on the sides.  I'll see how that works out, how bright it all is, etc.  If need be I can add Y adapters to those sockets and take the shelf down a notch and have 6 CFLs in there.  Or if that LED is just "Oh my God, I looked directly into the light, I'M BLIND!" bright, I can order more to have all 3 sockets use them.

Not currently pictured are the CPU fans because I don't have them yet.  I want to get the big ones and have one on each end of the case blowing in, but gotta see what I can get my hands on easily first.

Sunday, December 7, 2014

Next Steps

While I wait for that seed to sprout and my brass nameplate to be engraved, I think I've decided that I want to make a full on grow box for it.  And if what I did for the container hasn't tipped you off yet, I tend to go big when it comes to projects.  The real trick will be getting all the materials for the build without making the cops think I'm trying to grow weed!

"No officer, I swear I'm not growing pot, I'm trying to grow a the world's hottest pepper!  In the middle of the winter!  For the internet!"

Anyway, I've got a decent quality LED grow light coming in from China, a 9w red/blue mixture deal, but I'm not 100% convinced that its going to be enough.  So, I'm planning on adding sockets for two CFLs as well.  Put all that in an enclosed box lined with aluminum foil for reflection, and I'm thinking that should be enough to get the job done.

If I use pegs, I can have a fixed top and then raise/lower the floor of the box to keep the plant as close to the lights as possible without burning it as it grows.  Then the only thing that would be left is to grab a CPU fan or two and rig them up to run off a wall wart.  I rig those to run off of battery packs all the time, so rigging one to a wall adapter should be a piece of cake.

In fact, I'm bored and there's nothing good on TV, I think I'll run out to a hardware store and pick up a few pieces!